In this blog post, we will understand how to perform image classification using Keras MobileNet, deploy it in Google Chrome using TensorFlow.js and use it to make live predictions in the browser.
Being a Python developer with knowledge on Web Development is surely going to help you in the field of Artificial Intelligence in the long run. Because we now have the awesome capabilities of Keras and TensorFlow in a web browser using TensorFlow.js.
The interactive demo of what we will be making at the end of the tutorial is shown below. You can play around with the buttons provided to make predictions on an image.
- Click Load Model to load MobileNet model in your browser.
- Loading image -
- Click Demo Image to import a random image that belongs to an ImageNet category.
- Click Upload Image if you want to import an image from your disk.
- Click Predict to make predictions on the image loaded in the browser.
Keras MobileNet + TensorFlow.js Demo

Note: The above demo uses state-of-the-art Keras MobileNet that's trained on ImageNet with 1000 categories. If you upload an image that doesn't belong to any of the 1000 ImageNet categories, then the prediction might not be accurate!
Basic MobileNet in Python
In Keras, MobileNet resides in the applications module. Keras offers out of the box image classification using MobileNet if the category you want to predict is available in the ImageNet categories. If the category doesn’t exist in ImageNet categories, there is a method called fine-tuning that tunes MobileNet for your dataset and classes which we will discuss in another tutorial.
MobileNet offers tons of advantages than other state-of-the-art convolutional neural networks such as VGG16, VGG19, ResNet50, InceptionV3 and Xception.
- MobileNets are light weight deep neural networks best suited for mobile and embedded vision applications.
- MobileNets are based on a streamlined architecture that uses depthwise separable convolutions.
- MobileNet uses two simple global hyperparameters that efficiently trades off between accuracy and latency.
- MobileNet could be used in object detection, finegrain classification, face recognition, large-scale geo localization etc.
Following are the advantages of using MobileNet over other state-of-the-art deep learning models.
- Reduced network size - 17MB.
- Reduced number of parameters - 4.2 million.
- Faster in performance and are useful for mobile applications.
- Small, low-latency convolutional neural network.
Advantages always come up with some disadvantages and with MobileNet, it’s the accuracy. Yes! Eventhough MobileNet has reduced size, reduced parameters and performs faster, it is less accurate than other state-of-the-art networks as discussed in this paper. But don’t worry. There is only a slight reduction in accuracy when compared to other networks.
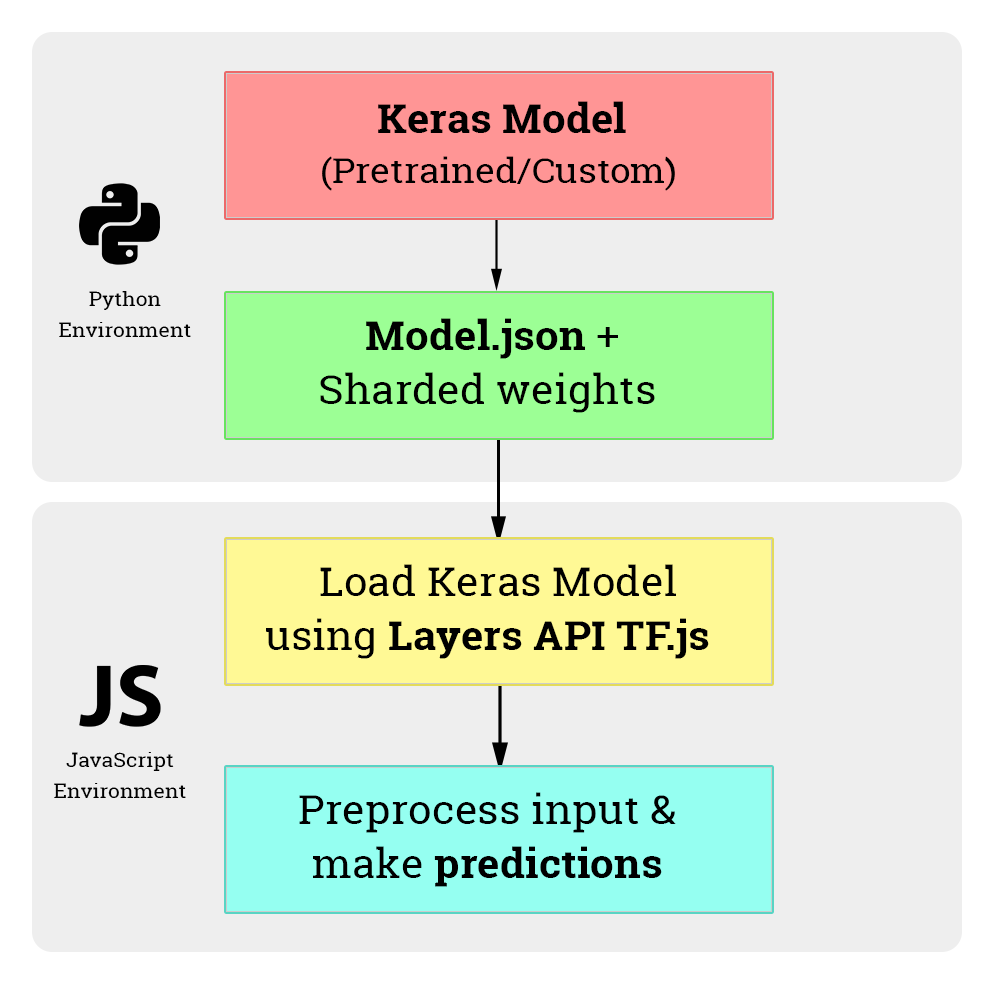
In this tutorial, we will follow the steps shown in Figure 1 to make Keras MobileNet available in a web browser using TensorFlow.js.
First, we will write a simple python script to make predictions on a test image using Keras MobileNet.
Before sending an image into MobileNet, we need to process the image using 4 simple steps. And to do that, you don’t need OpenCV. Keras provides all the necessary functions under keras.preprocessing module, and with some basic numpy functions, you are ready to go!
- Load the image and convert it to MobileNet’s input size (224, 224) using load_img() function.
- Convert the image into a numpy array using img_to_array().
- Expand the dimensions of the numpy array using np.expand_dims().
- Preprocess the image by rescaling all the values to the range [-1, 1] using mobilenet.preprocess_input().
1
2
3
4
5
6
7
8
9
10
11
12
13
14
15
16
17
18
19
20
21
22
23
24
25
26
27
28
29
30
31
32
33
34
35
36
37
38
# organize imports
import numpy as np
from keras.models import Model
from keras.preprocessing import image
from keras.applications import imagenet_utils, mobilenet
import tensorflowjs as tfjs

# process an image to be mobilenet friendly
def process_image(img_path):
  img = image.load_img(img_path, target_size=(224, 224))
  img_array = image.img_to_array(img)
  img_array = np.expand_dims(img_array, axis=0)
  pImg = mobilenet.preprocess_input(img_array)
  return pImg

# main function
if __name__ == '__main__':

  # path to test image
  test_img_path = "G:\\git-repos\\mobile-net-projects\\dataset\\test\\test_image_1.jpg"

  # process the test image
  pImg = process_image(test_img_path)

  # define the mobilenet model
  mobilenet = mobilenet.MobileNet()

  # make predictions on test image using mobilenet
  prediction = mobilenet.predict(pImg)

  # obtain the top-5 predictions
  results = imagenet_utils.decode_predictions(prediction)
  print(results)

  # convert the mobilenet model into tf.js model
  save_path = "output\\mobilenet"
  tfjs.converters.save_keras_model(mobilenet, save_path)
  print("[INFO] saved tf.js mobilenet model to disk..")
1
2
3
4
5
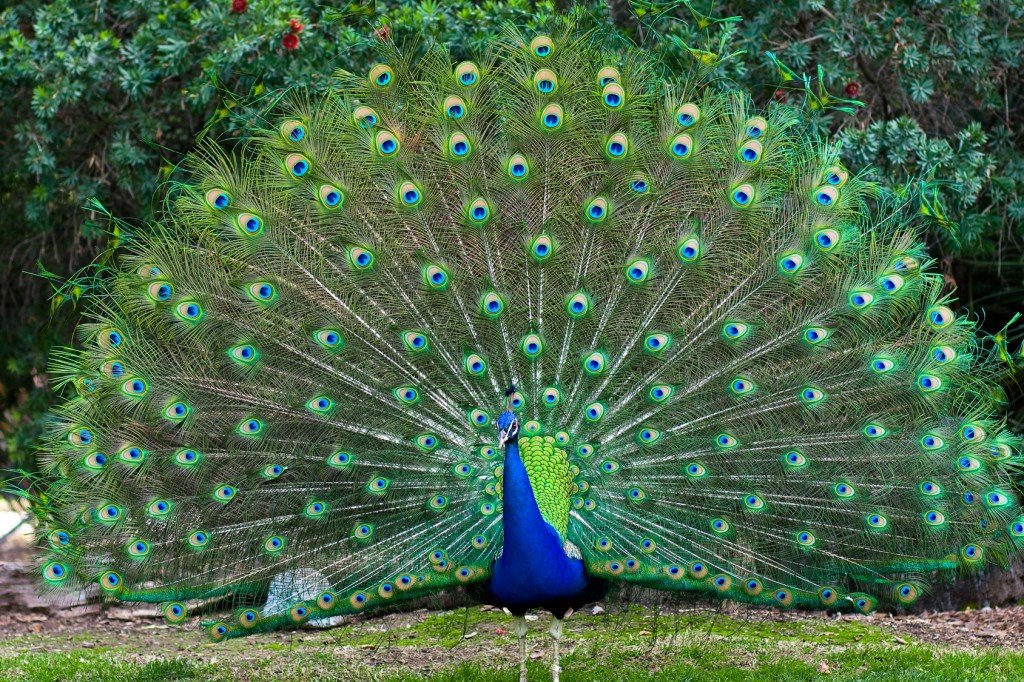
[[('n01806143', 'peacock', 0.9998889),
('n01806567', 'quail', 3.463593e-05),
('n02018795', 'bustard', 2.7573227e-05),
('n01847000', 'drake', 1.1352683e-05),
('n01795545', 'black_grouse', 1.0532762e-05)]]
- Lines 2-5 imports all the necessary functions to work with.
- Lines 8-13 is the special definition we use to process an image so that it becomes MobileNet friendly.
- Line 19 defines the test image path.
- Line 22 preprocesses the test image.
- Line 25 instantiates the MobileNet model.
- Line 28 makes predictions on the test image using MobileNet model.
- Line 31 gives the top-5 predictions of the test image.
- Line 32 prints out the top-5 predictions of the test image.
- Lines 36-38 converts keras mobilenet model into tf.js layers format at save_path.
Please make sure you change the test_img_path in line 19 to test an image from your disk. Figure 2 (shown below) is the test image that I have chosen and the MobileNet model accurately predicted it as a peacock with a probability of 99.99%. Pretty cool! 😍
Cool! Everything works perfectly in our Python environment. Now, we will use this pretrained mobile net model in a web browser.
Convert Keras model into Tf.js layers format
Before deploying a keras model in web, we need to convert the Keras mobilenet python model into tf.js layers format (which we already did in lines 36-38).
To deploy a Keras model in web, we need a package called tensorflowjs. Run the below command to get it.
1
pip install tensorflowjs
After installing it, you can either run the command as a standalone one or you can integrate it in your python script as shown below (which I prefer).
1
2
3
tensorflowjs_converter --input_format keras \
                       path_to_keras_model.h5 \
                       path/to/tfjs_target_dir
1
2
3
4
5
6
7
8
import tensorflowjs as tfjs

def train(...):
    model = keras.models.Sequential() # for example
    ...
    model.compile(...)
    model.fit(...)
    tfjs.converters.save_keras_model(model, tfjs_target_path)
The tfjs_target_path or save_path (in our case) is a folder that contains model.json and a set of sharded weight binary files. If you take a look into model.json file, you will see the model architecture or graph (a description of layers and their connections) plus a manifest of the weight files.
Keras model into TensorFlow JS
For this tutorial, I used my GitHub pages repo to hold the keras mobilenet model files. I copied the entire folder under save_path here.
This is crucial for our application to work because if you host these model files in a different server, you might face CORS issue in your web app. Storing your model files in the same domain as your web app is safer and preferred way.
Let’s get started with the sweet TensorFlow.js 😘
You need these three javascript libraries loaded in your website.
- IMAGENET_CLASSES variable that has all the ImageNet categories indexed which could easily be loaded from here.
- TensorFlow.js latest source.
- jQuery to make JavaScript easier.
1
2
3
<script type="text/javascript" src="/js/imagenet_classes.js"></script>
<script src="https://cdn.jsdelivr.net/npm/@tensorflow/tfjs@latest"></script>
<script type="text/javascript" src="https://code.jquery.com/jquery-2.1.1.min.js"></script>
Once you load all the above three scripts, you can open up a new file named mobile-net.js that will have all the functionality needed to make Keras MobileNet model work in a web browser.
The user interface that I made at the start of the tutorial has HTML, CSS and JavaScript code combined. We will look into model specific part instead of looking into every single line of code.
1. Load Keras model into TF.js
Firstly, you need to load the Keras pretrained model json that you have stored in your web server. To do this, you can use the below code snippet.
The below code snippet is an async function that loads a keras model json using tf.loadModel(). In line 17, await means without disturbing the UI, you are asking JavaScript to load model behind the scenes. To view the status of model loading, we use a progress bar as well as console.log().
1
2
3
4
5
6
7
8
9
10
11
12
13
14
15
16
17
18
19
20
21
22
23
24
let model;
async function loadModel() {
  console.log("model loading..");

  // display model loading progress box
  loader = document.getElementById("progress-box");
  load_button = document.getElementById("load-button");
  loader.style.display = "block";

  // model name is "mobilenet"
  modelName = "mobilenet";

  // clear the model variable
  model = undefined;

  // load the model using a HTTPS request (where you have stored your model files)
  model = await tf.loadLayersModel('https://gogul09.github.io/models/mobilenet/model.json');

  // hide model loading progress box
  loader.style.display = "none";
  load_button.disabled = true;
  load_button.innerHTML = "Loaded Model";
  console.log("model loaded..");
}
2. Upload image from disk
To upload an image from disk, you can use the below code snippet which makes use of HTML5 File API. I have used a button Upload Image which has a change handler associated with it.
1
2
<!-- used to get image from disk -->
<input id="select-file-image" type="file">
1
2
3
4
5
6
7
8
9
10
11
12
13
14
15
// if there is a change to "Upload Image" button,
// load and render the image
$("#select-file-image").change(function() {
  renderImage(this.files[0]);
}

// renders the image which is loaded from disk to the img tag
function renderImage(file) {
  var reader = new FileReader();
  reader.onload = function(event) {
    img_url = event.target.result;
    document.getElementById("test-image").src = img_url;
  }
  reader.readAsDataURL(file);
}
3. Predict using MobileNet model
To make predictions using mobilenet that’s now loaded into Tf.js environment, we need to perform two steps.
- Preprocess the input image to be mobilenet friendly.
- Make predicitons on the input image.
3.1 Preprocess the input image
As I have already mentioned, input image size to mobilenet is [224, 224] as well as the features are scaled between [-1, 1]. You need to perform these two steps before making predictions using the model. To do this, we use preprocessImage() function that takes in two arguments image and modelName.
The input image can easily be loaded using tf.fromPixels() , resized using resizeNearestNeighbor() and converting all the values in the image to float using toFloat().
After that, we feature scale the values in the image tensor using a scalar value of 127.5 which is the center value of image pixel range [0, 255]. For each pixel value in the image, we subtract this offset value and divide by this offset value to scale between [-1, 1]. We then expand the dimensions using expandDims().
1
2
3
4
5
6
7
8
9
10
11
12
13
14
15
16
17
18
19
20
21
22
23
24
25
26
// preprocess the image to be mobilenet friendly
function preprocessImage(image, modelName) {

  // resize the input image to mobilenet's target size of (224, 224)
  let tensor = tf.browser.fromPixels(image)
    .resizeNearestNeighbor([224, 224])
    .toFloat();

  // if model is not available, send the tensor with expanded dimensions
  if (modelName === undefined) {
    return tensor.expandDims();
  }

  // if model is mobilenet, feature scale tensor image to range [-1, 1]
  else if (modelName === "mobilenet") {
    let offset = tf.scalar(127.5);
    return tensor.sub(offset)
      .div(offset)
      .expandDims();
  }

  // else throw an error
  else {
    alert("Unknown model name..")
  }
}
3.2 Predict using Tf.js model
After preprocessing the image, I have made a handler for Predict button. Again, this is also an async function that uses await till the model make successfull predictions.
Prediction using a Tf.js model is straightforward as Keras which uses model.predict(tensor). To get the predictions, we pass it data() to the former.
Results from the predictions are mapped to an array named results using IMAGENET_CLASSES that we loaded at the beginning of this tutorial. We also sort this array based on the probability that is highest using sort() and take only the top-5 probabilities using slice().
1
2
3
4
5
6
7
8
9
10
11
12
13
14
15
16
17
18
19
20
21
22
23
24
25
26
27
28
29
30
31
32
33
34
35
36
37
38
39
40
41
42
43
44
45
// If "Predict Button" is clicked, preprocess the image and
// make predictions using mobilenet
$("#predict-button").click(async function () {
  // check if model loaded
  if (model == undefined) {
    alert("Please load the model first..")
  }

  // check if image loaded
  if (document.getElementById("predict-box").style.display == "none") {
    alert("Please load an image using 'Demo Image' or 'Upload Image' button..")
  }

  // html-image element can be given to tf.fromPixels
  let image  = document.getElementById("test-image");
  let tensor = preprocessImage(image, modelName);

  // make predictions on the preprocessed image tensor
  let predictions = await model.predict(tensor).data();

  // get the model's prediction results
  let results = Array.from(predictions)
    .map(function (p, i) {
      return {
        probability: p,
        className: IMAGENET_CLASSES[i]
      };
    }).sort(function (a, b) {
      return b.probability - a.probability;
    }).slice(0, 5);

  // display the top-1 prediction of the model
  document.getElementById("results-box").style.display = "block";
  document.getElementById("prediction").innerHTML = "MobileNet prediction - <b>" + results[0].className + "</b>";

  // display top-5 predictions of the model
  var ul = document.getElementById("predict-list");
  ul.innerHTML = "";
  results.forEach(function (p) {
    console.log(p.className + " " + p.probability.toFixed(6));
    var li = document.createElement("LI");
    li.innerHTML = p.className + " " + p.probability.toFixed(6);
    ul.appendChild(li);
  });
});
There you go! We now have the power of state-of-the-art Keras pretrained model MobileNet in a client browser that is able to make predictions on images that belong to ImageNet category.
Notice that the mobilenet model loads very quickly in the browser and makes predictions very fast 😎
References
- TensorFlow.js - Official Documentation
- Keras - Official Documentation
- Importing a Keras model into TensorFlow.js
- Introduction to TensorFlow.js - Intelligence and Learning
- TensorFlow.js: Tensors - Intelligence and Learning
- TensorFlow.js Quick Start
- Session 6 - TensorFlow.js - Intelligence and Learning
- Session 7 - TensorFlow.js Color Classifier - Intelligence and Learning
- Tensorflow.js Explained
- Webcam Tracking with Tensorflow.js
- Try TensorFlow.js in your browser
In case if you found something useful to add to this article or you found a bug in the code or would like to improve some points mentioned, feel free to write it down in the comments. Hope you found something useful here.