When I first started to experiment with OpenCV, all I found was codes that explain some image processing concept such as Canny Edge Detection, Thresholding, Grabcut Segmentation etc. I thought of doing an end-to-end project which could use all these elements to build an intelligent system. I started using Python and OpenCV after learning some basics from Adrian’s pyimagesearch website. After my professor bought a Robotic Arm, I decided to do Hand Gesture Recognition. You can look at the video of our project here.
Hand gesture recognition is a cool project to start for a Computer Vision enthusiast as it involves an intuitive step-by-step procedure which could be easily understood, so that you could build more complex stuff on top of these concepts.
1
2
3
4
5
6
7
How to approach a Computer Vision problem step-by-step?
What is Background Subtraction?
What is Motion Detection?
What is Thresholding?
What are Contours?
How to implement the above concepts in code using OpenCV and Python?
How to segment hand-region effectively from a real-time video sequence?
Prerequisites
I assume that you are familiar with basics of Python, NumPy and OpenCV as they are the prerequisites for this tutorial. If you want to quickly understand core concepts in Python and NumPy, check out my posts here and here. In addition to these, you must be familiar with Image basics (such as pixels, dimensions etc) and some basic operations with images such as Thresholding and Segmentation.
Introduction
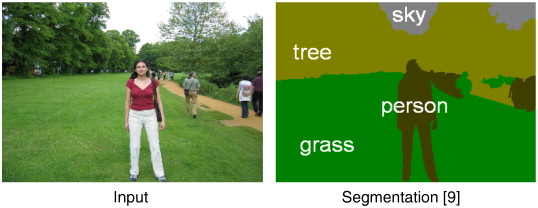
Gesture recognition has been a very interesting problem in Computer Vision community for a long time. This is particularly due to the fact that segmentation of foreground object from a cluttered background is a challenging problem in real-time. The most obvious reason is because of the semantic gap involved when a human looks at an image and a computer looking at the same image. Humans can easily figure out what’s in an image but for a computer, images are just 3-dimensional matrices. It is because of this, computer vision problems remains a challenge. Look at the image below.

This image describes the semantic segmentation problem where the objective is to find different regions in an image and tag its corresponding labels. In this case, “sky”, “person”, “tree” and “grass”. A quick Google search will give you the necessary links to learn more about this research topic. As this is a very difficult problem to solve, we will restrict our focus to nicely segment one foreground object from a live video sequence.
Problem statement
We are going to recognize hand gestures from a video sequence. To recognize these gestures from a live video sequence, we first need to take out the hand region alone removing all the unwanted portions in the video sequence. After segmenting the hand region, we then count the fingers shown in the video sequence to instruct a robot based on the finger count. Thus, the entire problem could be solved using 2 simple steps -
- Find and segment the hand region from the video sequence.
- Count the number of fingers from the segmented hand region in the video sequence.
How are we going to achieve this? To understand hand-gesture recognition in depth, I have decided to make this tutorial into two parts based on the above two steps.
The first part will be discussed in this tutorial with code. Let’s get started!
Segment the Hand region
The first step in hand gesture recognition is obviously to find the hand region by eliminating all the other unwanted portions in the video sequence. This might seem to be frightening at first. But don’t worry. It will be a lot easier using Python and OpenCV!
Note: Video sequence is just a collection of frames or collection of images that runs with respect to time.
Before getting into further details, let us understand how could we possibly figure out the hand region.
Background Subtraction
First, we need an efficient method to separate foreground from background. To do this, we use the concept of running averages. We make our system to look over a particular scene for 30 frames. During this period, we compute the running average over the current frame and the previous frames. By doing this, we essentially tell our system that -
Ok robot! The video sequence that you stared at (running average of those 30 frames) is the background.
After figuring out the background, we bring in our hand and make the system understand that our hand is a new entry into the background, which means it becomes the foreground object. But how are we going to take out this foreground alone? The answer is Background Subtraction.
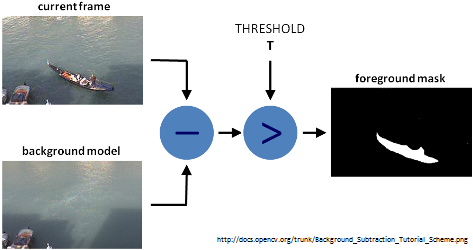
Look at the image below which describes how Background Subtraction works. If you want to write code using C++, please look at this excellent resource. If you want to code using Python, read on.

After figuring out the background model using running averages, we use the current frame which holds the foreground object (hand in our case) in addition to the background. We calculate the absolute difference between the background model (updated over time) and the current frame (which has our hand) to obtain a difference image that holds the newly added foreground object (which is our hand). This is what Background Subtraction is all about.
Motion Detection and Thresholding
To detect the hand region from this difference image, we need to threshold the difference image, so that only our hand region becomes visible and all the other unwanted regions are painted as black. This is what Motion Detection is all about.
Note: Thresholding is the assigment of pixel intensities to 0's and 1's based a particular threshold level so that our object of interest alone is captured from an image.
Contour Extraction
After thresholding the difference image, we find contours in the resulting image. The contour with the largest area is assumed to be our hand.
Note: Contour is the outline or boundary of an object located in an image.
So, our first step to find the hand region from a video sequence involves three simple steps.
- Background Subtraction
- Motion Detection and Thresholding
- Contour Extraction
Implementation
segment.pycode
1
2
3
4
5
6
7
# organize imports
import cv2
import imutils
import numpy as np

# global variables
bg = None
First, we import all the essential packages to work with and initialize the background model. In case, if you don’t have these packages installed in your computer, I have posts to install all these packages in Ubuntu and Windows.
segment.pycode
1
2
3
4
5
6
7
8
9
10
11
12
#--------------------------------------------------
# To find the running average over the background
#--------------------------------------------------
def run_avg(image, aWeight):
    global bg
    # initialize the background
    if bg is None:
        bg = image.copy().astype("float")
        return

    # compute weighted average, accumulate it and update the background
    cv2.accumulateWeighted(image, bg, aWeight)
Next, we have our function that is used to compute the running average between the background model and the current frame. This function takes in two arguments - current frame and aWeight, which is like a threshold to perform running average over images. If the background model is None (i.e if it is the first frame), then initialize it with the current frame. Then, compute the running average over the background model and the current frame using cv2.accumulateWeighted() function. Running average is calculated using the formula given below -
\[dst(x,y) = (1-a).dst(x,y) + a.src(x,y)\]- \( src(x,y) \) - Source image or input image (1 or 3 channel, 8-bit or 32-bit floating point)
- \( dst(x,y) \) - Destination image or output image (same channel as source image, 32-bit or 64-bit floating point)
- \( a \) - Weight of the source image (input image)
To learn more about what is happening behind this function, visit this link.
segment.pycode
1
2
3
4
5
6
7
8
9
10
11
12
13
14
15
16
17
18
19
20
21
#---------------------------------------------
# To segment the region of hand in the image
#---------------------------------------------
def segment(image, threshold=25):
    global bg
    # find the absolute difference between background and current frame
    diff = cv2.absdiff(bg.astype("uint8"), image)

    # threshold the diff image so that we get the foreground
    thresholded = cv2.threshold(diff, threshold, 255, cv2.THRESH_BINARY)[1]

    # get the contours in the thresholded image
    (_, cnts, _) = cv2.findContours(thresholded.copy(), cv2.RETR_EXTERNAL, cv2.CHAIN_APPROX_SIMPLE)

    # return None, if no contours detected
    if len(cnts) == 0:
        return
    else:
        # based on contour area, get the maximum contour which is the hand
        segmented = max(cnts, key=cv2.contourArea)
        return (thresholded, segmented)
Our next function is used to segment the hand region from the video sequence. This function takes in two parameters - current frame and threshold used for thresholding the difference image.
First, we find the absolute difference between the background model and the current frame using cv2.absdiff() function.
Next, we threshold the difference image to reveal only the hand region. Finally, we perform contour extraction over the thresholded image and take the contour with the largest area (which is our hand).
We return the thresholded image as well as the segmented image as a tuple. The math behind thresholding is pretty simple. If \( x(n) \) represents the pixel intensity of an input image at a particular pixel coordinate, then \( threshold \) decides how nicely we are going to segment/threshold the image into a binary image.
\[x(n) = \begin{cases} 1, & \text{if $n$ >= $threshold$} \\ 0, & \text{if $n$ < $threshold$} \end{cases}\]segment.pycode
1
2
3
4
5
6
7
8
9
10
11
12
13
14
15
16
17
18
19
20
21
22
23
24
25
26
27
28
29
30
31
32
33
34
35
36
37
38
39
40
41
42
43
44
45
46
47
48
49
50
51
52
53
54
55
56
57
58
59
60
61
62
63
64
65
66
67
68
69
70
71
72
73
74
75
76
77
#-----------------
# MAIN FUNCTION
#-----------------
if __name__ == "__main__":
    # initialize weight for running average
    aWeight = 0.5

    # get the reference to the webcam
    camera = cv2.VideoCapture(0)

    # region of interest (ROI) coordinates
    top, right, bottom, left = 10, 350, 225, 590

    # initialize num of frames
    num_frames = 0

    # keep looping, until interrupted
    while(True):
        # get the current frame
        (grabbed, frame) = camera.read()

        # resize the frame
        frame = imutils.resize(frame, width=700)

        # flip the frame so that it is not the mirror view
        frame = cv2.flip(frame, 1)

        # clone the frame
        clone = frame.copy()

        # get the height and width of the frame
        (height, width) = frame.shape[:2]

        # get the ROI
        roi = frame[top:bottom, right:left]

        # convert the roi to grayscale and blur it
        gray = cv2.cvtColor(roi, cv2.COLOR_BGR2GRAY)
        gray = cv2.GaussianBlur(gray, (7, 7), 0)

        # to get the background, keep looking till a threshold is reached
        # so that our running average model gets calibrated
        if num_frames < 30:
            run_avg(gray, aWeight)
        else:
            # segment the hand region
            hand = segment(gray)

            # check whether hand region is segmented
            if hand is not None:
                # if yes, unpack the thresholded image and
                # segmented region
                (thresholded, segmented) = hand

                # draw the segmented region and display the frame
                cv2.drawContours(clone, [segmented + (right, top)], -1, (0, 0, 255))
                cv2.imshow("Thesholded", thresholded)

        # draw the segmented hand
        cv2.rectangle(clone, (left, top), (right, bottom), (0,255,0), 2)

        # increment the number of frames
        num_frames += 1

        # display the frame with segmented hand
        cv2.imshow("Video Feed", clone)

        # observe the keypress by the user
        keypress = cv2.waitKey(1) & 0xFF

        # if the user pressed "q", then stop looping
        if keypress == ord("q"):
            break

# free up memory
camera.release()
cv2.destroyAllWindows()
The above code sample is the main function of our program. We initialize the aWeight to 0.5. As shown eariler in the running average equation, this threshold means that if you set a lower value for this variable, running average will be performed over larger amount of previous frames and vice-versa. We take a reference to our webcam using cv2.VideoCapture(0), which means that we get the default webcam instance in our computer.
Instead of recognizing gestures from the overall video sequence, we will try to minimize the recognizing zone (or the area), where the system has to look for hand region. To highlight this region, we use cv2.rectangle() function which needs top, right, bottom and left pixel coordinates.
To keep track of frame count, we initialize a variable num_frames. Then, we start an infinite loop and read the frame from our webcam using camera.read() function. We then resize the input frame to a fixed width of 700 pixels maintaining the aspect ratio using imutils library and flip the frame to avoid mirror view.
Next, we take out only the region of interest (i.e the recognizing zone), using simple NumPy slicing. We then convert this ROI into grayscale image and use gaussian blur to minimize the high frequency components in the image. Until we get past 30 frames, we keep on adding the input frame to our run_avg function and update our background model. Please note that, during this step, it is mandatory to keep your camera without any motion. Or else, the entire algorithm fails.
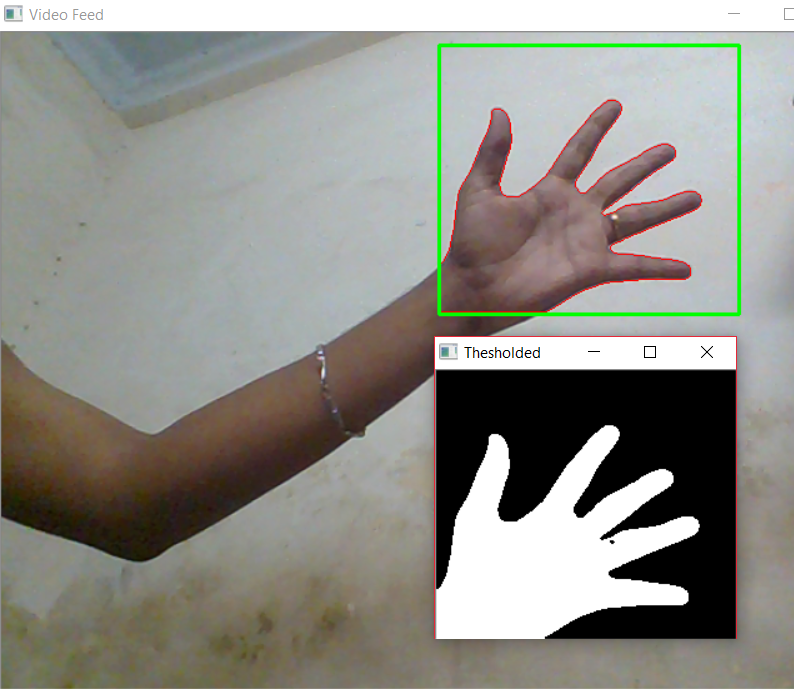
After updating the background model, the current input frame is passed into the segment function and the thresholded image and segmented image are returned. The segmented contour is drawn over the frame using cv2.drawContours() and the thresholded output is shown using cv2.imshow().
Finally, we display the segmented hand region in the current frame and wait for a keypress to exit the program. Notice that we maintain bg variable as a global variable here. This is important and must be taken care of.
Executing code
Copy all the code given above and put it in a single file named segment.py. Or else, visit my GitHub link to download this code and save it in your computer. Then, open up a Terminal or a Command prompt and type python segment.py.
Note: Remember to update the background model by keeping the camera static without any motion. After 5-6 seconds, show your hand in the recognizing zone to reveal your hand region alone. Below you can see how our system segments the hand region from the live video sequence effectively.

Summary
In this tutorial, we have learnt about Background Subtraction, Motion Detection, Thresholding and Contour Extraction to nicely segment hand region from a real-time video sequence using OpenCV and Python. In the next part of the tutorial, we will extend this simple technique to make our system (intelligent enough) to recognize hand gestures by counting the fingers shown in the video sequence. Using this, you could build an intelligent robot that performs some operations based on your gesture commands.
References
In case if you found something useful to add to this article or you found a bug in the code or would like to improve some points mentioned, feel free to write it down in the comments. Hope you found something useful here.