In this blog post, we will quickly understand how to use state-of-the-art Deep Learning models in Keras to solve a supervised image classification problem using our own dataset with/without GPU acceleration.
We will be using the pre-trained Deep Neural Nets trained on the ImageNet challenge that are made publicly available in Keras. We will specifically use FLOWERS17 dataset from the University of Oxford.
The pre-trained models we will consider are VGG16, VGG19, Inception-v3, Xception, ResNet50, InceptionResNetv2 and MobileNet. Instead of creating and training deep neural nets from scratch (which takes time and involves many iterations), what if we use the pre-trained weights of these deep neural net architectures (trained on ImageNet dataset) and use it for our own dataset?
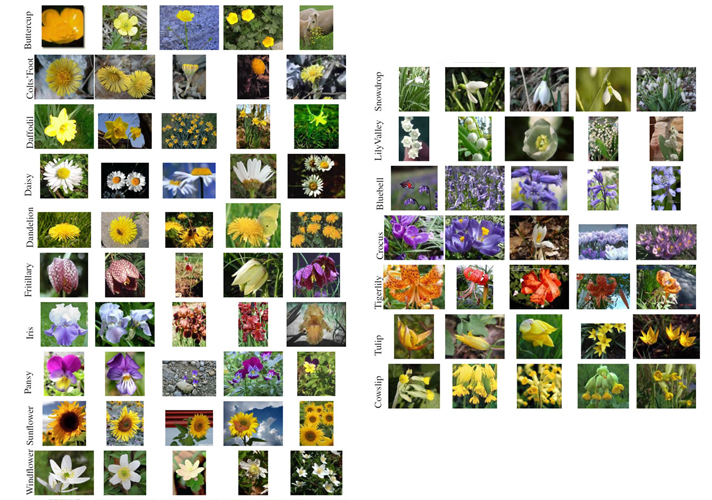
Let’s start feature extraction using Deep Convolutional Neural Networks! What we will be making at the end of this tutorial is shown below.

Update (16/12/2017): After installing Anaconda with Python 3.6 to work with TensorFlow in Windows 10, I found two additional pretrained models added to Keras applications module - InceptionResNetV2 and MobileNet. I have updated my code accordingly to enable these models to work for our own dataset.
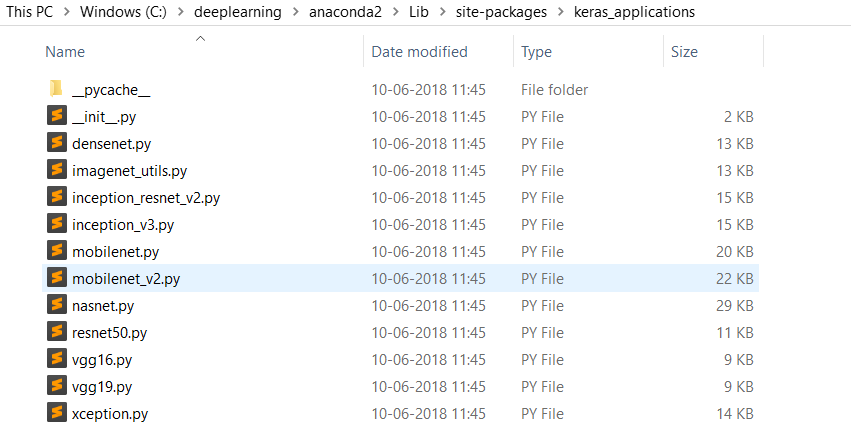
Update (10/06/2018): If you use Keras 2.2.0 version, then you will not find the applications module inside keras installed directory. Keras has externalized the applications module to a separate directory called keras_applications from where all the pre-trained models will now get imported. To make changes to any <pre-trained_model>.py file, simply go to the below directory where you will find all the pre-trained models .py files.
Update (16/12/2017): You could also see the new MobileNet architecture achieves the best accuracy compared to other architectures. In addition, I found that MobileNet uses DepthwiseConvolution layers and has lesser number of parameters, reduced weights size and depth. More details about this can be found at - MobileNets: Efficient Convolutional Neural Networks for Mobile Vision Applications.
Beautiful Keras
Keras is an amazing library to quickly start Deep Learning for people entering into this field. Developed by François Chollet, it offers simple understandable functions and syntax to start building Deep Neural Nets right away instead of worrying too much on the programming part. Keras is a wrapper for Deep Learning libraries namely Theano and TensorFlow. I found the documentation and GitHub repo of Keras well maintained and easy to understand. If you know some technical details regarding Deep Neural Networks, then you will find the Keras documentation as the best place to learn.
Feature Extraction using ConvNets
Traditional machine learning approach uses feature extraction for images using Global feature descriptors such as Local Binary Patterns (LBP), Histogram of Oriented Gradients (HoG), Color Histograms etc. or Local descriptors such as SIFT, SURF, ORB etc. These are hand-crafted features that requires domain level expertise.
But here comes Convolutional Neural Networks (CNN)! Instead of using hand-crafted features, Deep Neural Nets automatically learns these features from images in a hierarchical fashion. Lower layers learn low-level features such as Corners, Edges whereas middle layers learn color, shape etc. and higher layers learn high-level features representing the object in the image.
Instead of making a CNN as a model to classify images, what if we use it as a Feature Extractor by taking the activations available before the last fully connected layer of the network (i.e. before the final softmax classifier). These activations will be acting as the feature vector for a machine learning model (classifier) which further learns to classify it. This type of approach is well suited for Image Classification problems, where instead of training a CNN from scratch (which is time-consuming and tedious), a pre-trained CNN could be used as a Feature Extractor - Transfer Learning.
Keras Pre-trained Models
The Deep Neural Net architectures that won the ImageNet challenge are made publicly available in Keras including the model weights. Please check this page for more details regarding each neural network architecture. Please be aware of the input image_size that are given to each model as we will be transforming our input images to these sizes. Below are the pre-trained models available in Keras at the time of writing this post.
- Xception
- VGG16
- VGG19
- ResNet50
- InceptionV3
- InceptionResNetV2
- MobileNet
The applications module of Keras provides all the necessary functions needed to use these pre-trained models right away.
Below is the table that shows image size, weights size, top-1 accuracy, top-5 accuracy, no.of.parameters and depth of each deep neural net architecture available in Keras.
| Model | Image size | Weights size | Top-1 accuracy | Top-5 accuracy | Parameters | Depth |
|---|---|---|---|---|---|---|
| Xception | 299 x 299 | 88 MB | 0.790 | 0.945 | 22,910,480 | 126 |
| VGG16 | 224 x 224 | 528 MB | 0.715 | 0.901 | 138,357,544 | 23 |
| VGG19 | 224 x 224 | 549 MB | 0.727 | 0.910 | 143,667,240 | 26 |
| ResNet50 | 224 x 224 | 99 MB | 0.759 | 0.929 | 25,636,712 | 168 |
| InceptionV3 | 299 x 299 | 92 MB | 0.788 | 0.944 | 23,851,784 | 159 |
| Inception ResNetV2 |
299 x 299 | 215 MB | 0.804 | 0.953 | 55,873,736 | 572 |
| MobileNet | 224 x 224 | 17 MB | 0.665 | 0.871 | 4,253,864 | 88 |
Note: All the above architectures can be created using either Theano or TensorFlow except Xception and MobileNet (as they depend on Separable Convolutions and Depthwise Convolutions which is available only in TensorFlow).
GPU acceleration
GPUs are the beasts when it comes to Deep Learning and no wonder if you enable GPU in your computer, you can speed up feature extraction as well as training process. Steps to activate GPU acceleration to train deep neural nets in Windows 10 are provided in my blog post.
Dependencies
You will need the following Python packages to run the code provided in this tutorial.
- Theano or TensorFlow
- Keras
- NumPy
- scikit-learn
- matplotlib
- seaborn
- h5py
Note: If you don't have an environment to do Deep Learning in Windows or Linux, please make sure you use the below two links to do that and then follow on.
5 simple steps for Deep Learning
- Prepare the training dataset with flower images and its corresponding labels.
- Specify your own configurations in conf.json file.
- Extract and store features from the last fully connected layers (or intermediate layers) of a pre-trained Deep Neural Net (CNN) using extract_features.py.
- Train a Machine Learning model such as Logisitic Regression using these CNN extracted features and labels using train.py.
- Evaluate the trained model on unseen data and make further optimizations if necessary.
Folder structure
1
2
3
4
5
6
7
8
9
10
11
12
13
14
15
16
17
18
19
20
21
22
23
24
25
26
27
28
29
30
31
32
33
34
35
36
37
38
39
40
41
42
43
44
45
|--flower_recognition
|--|--conf
|--|--|--conf.json
|--|--dataset
|--|--|--train
|--|--|--test
|--|--output
|--|--|--flower_17
|--|--|--|--inceptionv3
|--|--|--|--|--classifier.cPickle
|--|--|--|--|--labels.h5
|--|--|--|--|--features.h5
|--|--|--|--|--results.txt
|--|--|--|--vgg16
|--|--|--|--|--classifier.cPickle
|--|--|--|--|--labels.h5
|--|--|--|--|--features.h5
|--|--|--|--|--results.txt
|--|--|--|--vgg19
|--|--|--|--|--classifier.cPickle
|--|--|--|--|--labels.h5
|--|--|--|--|--features.h5
|--|--|--|--|--results.txt
|--|--|--|--resnet50
|--|--|--|--|--classifier.cPickle
|--|--|--|--|--labels.h5
|--|--|--|--|--features.h5
|--|--|--|--|--results.txt
|--|--|--|--xception
|--|--|--|--|--classifier.cPickle
|--|--|--|--|--labels.h5
|--|--|--|--|--features.h5
|--|--|--|--|--results.txt
|--|--|--|--inceptionresnetv2
|--|--|--|--|--classifier.cPickle
|--|--|--|--|--labels.h5
|--|--|--|--|--features.h5
|--|--|--|--|--results.txt
|--|--|--|--mobilenet
|--|--|--|--|--classifier.cPickle
|--|--|--|--|--labels.h5
|--|--|--|--|--features.h5
|--|--|--|--|--results.txt
|--|--extract_features.py
|--|--train.py
Training dataset
Download the FLOWER17 dataset from this website. Unzip the file and you will see all the 1360 images listed in one single folder named *.jpg. The FLOWERS17 dataset has 1360 images of 17 flower species classes with 80 images per class.
To build our training dataset, we need to create a master folder named dataset, inside which we need to create two more folders namely train and test. Inside train folder, we need to create 17 folders corresponding to the flower species labels.
To automate this task, I have a script that takes in input path that has all the 1360 images and dumps 17 folders inside train folder. In those 17 folders, each folder will be having 80 flower images belonging to that folder name. Below is the screenshot of how to organize our training dataset as well as the output folder to store features, labels, results and classifier.
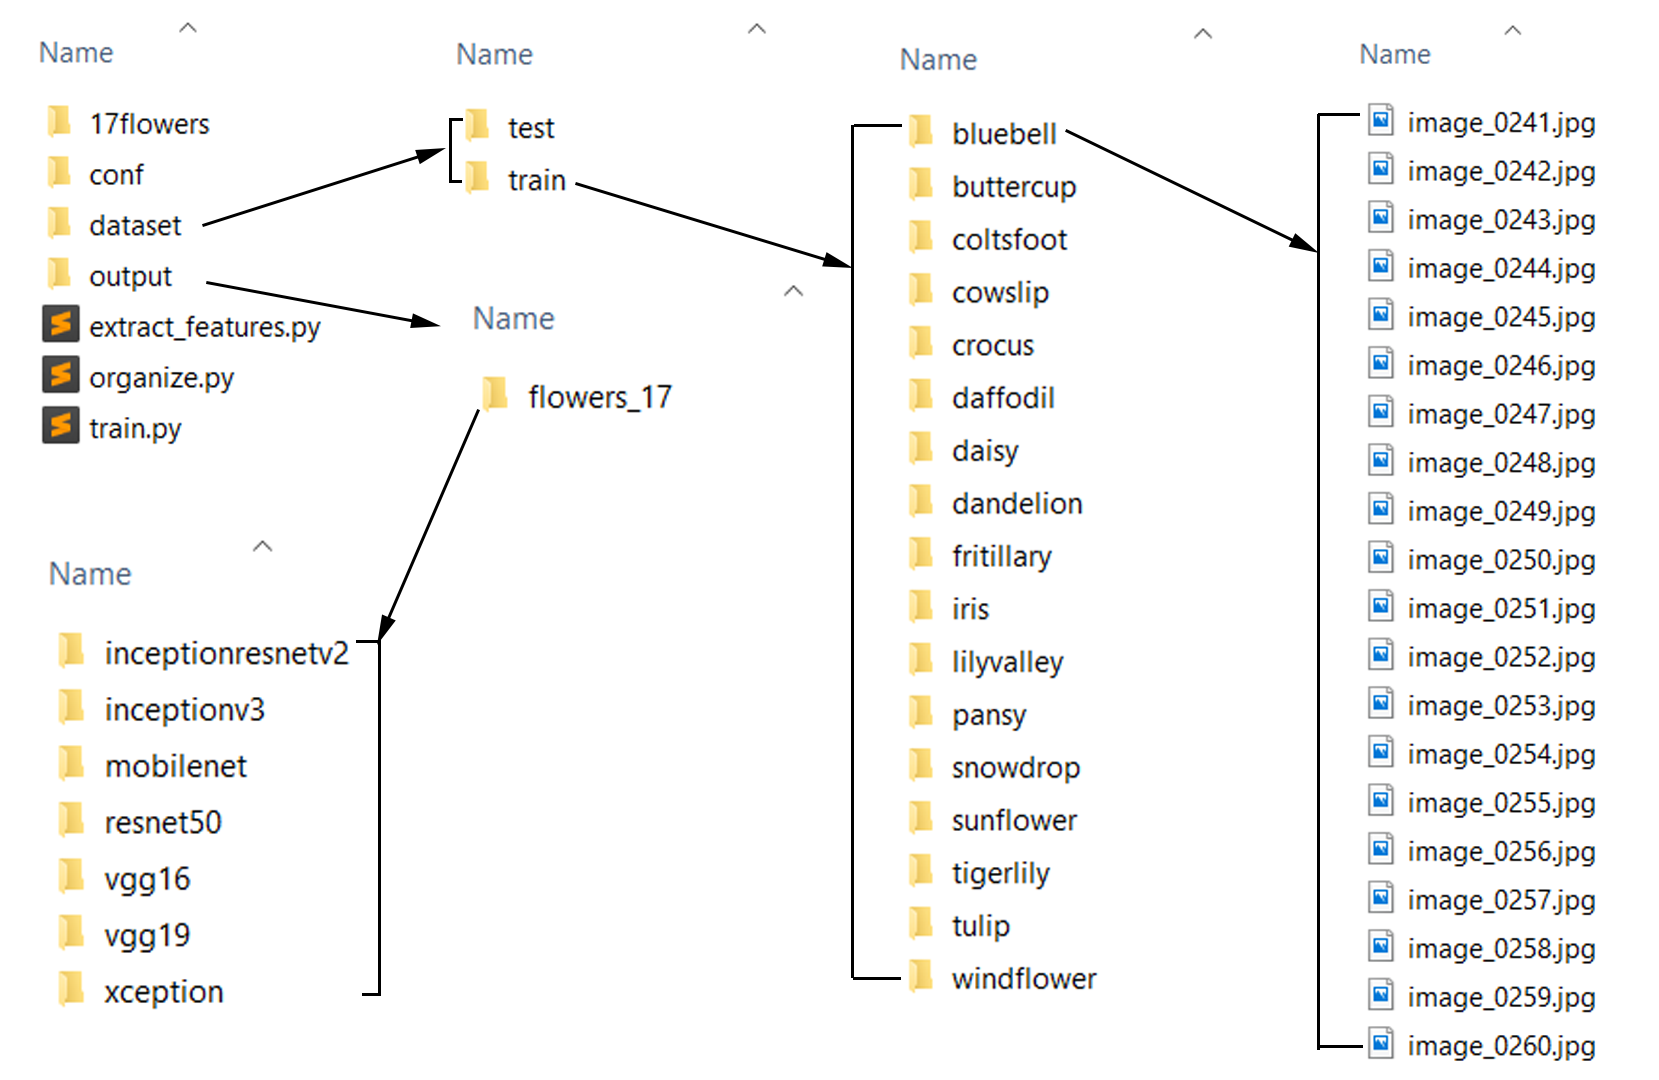
Script to organize training dataset is given below. Please be aware of the input_path and output_path that you give to create folders and store the images.
1
2
3
4
5
6
7
8
9
10
11
12
13
14
15
16
17
18
19
20
21
22
23
24
25
26
27
28
29
30
31
32
33
34
35
36
37
38
39
40
41
42
43
44
45
46
47
48
49
50
# organize imports
import os
import glob
import datetime

# print start time
print("[INFO] program started on - " + str(datetime.datetime.now))

# get the input and output path
input_path  = "G:\\workspace\\machine-intelligence\\deep-learning\\flower-recognition\\17flowers\\jpg"
output_path = "G:\\workspace\\machine-intelligence\\deep-learning\\flower-recognition\\dataset\\train"

# get the class label limit
class_limit = 17

# take all the images from the dataset
image_paths = glob.glob(input_path + "\\*.jpg")

# variables to keep track
label = 0
i = 0
j = 80

# flower17 class names
class_names = ["daffodil", "snowdrop", "lilyvalley", "bluebell", "crocus",
			   "iris", "tigerlily", "tulip", "fritillary", "sunflower",
			   "daisy", "coltsfoot", "dandelion", "cowslip", "buttercup",
			   "windflower", "pansy"]

# change the current working directory
os.chdir(output_path)

# loop over the class labels
for x in range(1, class_limit+1):
	# create a folder for that class
	os.system("mkdir " + class_names[label])
	# get the current path
	cur_path = output_path + "\\" + class_names[label] + "\\"
	# loop over the images in the dataset
	for image_path in image_paths[i:j]:
		original_path = image_path
		image_path = image_path.split("\\")
		image_path = image_path[len(image_path)-1]
		os.system("copy " + original_path + " " + cur_path + image_path)
	i += 80
	j += 80
	label += 1

# print end time
print("[INFO] program ended on - " + str(datetime.datetime.now))
Deep Learning pipeline
1. conf.json
This is the configuration file or the settings file we will be using to provide inputs to our system. This is just a json file which is a key-value pair file format to store data effectively.
- The model key takes in any of these parameters - inceptionv3, resnet50, vgg16, vgg19, xception, inceptionresnetv2 and mobilenet.
- The weights key takes the value imagenet specifying that we intend to use weights from imagenet. You can also set this to None if you wish to train the network from scratch.
- The include_top key takes the value false specifying that we are going to take the features from any intermediate layer of the network. You can set this to true if you want to extract features before the fully connected layers.
- The test_size key takes the value in the range (0.10 - 0.90). This is to make a split between your overall data into training and testing.
- The seed key takes any value to reproduce same results everytime you run the code.
- The num_classes specifies the number of classes or labels considered for the image classification problem.
1
2
3
4
5
6
7
8
9
10
11
12
13
14
15
16
17
{
  "model"           : "inceptionv3",
  "weights"         : "imagenet",
  "include_top"     : false,

  "train_path"      : "dataset/train",
  "test_path"       : "dataset/test",
  "features_path"   : "output/flowers_17/inceptionv3/features.h5",
  "labels_path"     : "output/flowers_17/inceptionv3/labels.h5",
  "results"         : "output/flowers_17/inceptionv3/results.txt",
  "classifier_path" : "output/flowers_17/inceptionv3/classifier.pickle",
  "model_path"      : "output/flowers_17/inceptionv3/model",

  "test_size"       : 0.10,
  "seed"            : 9,
  "num_classes"     : 17
}
Here, I have decided to use inceptionv3 architecture of GoogleNet pre-trained on imagenet including the top layers. You can extract features from any arbitrary layer using the layer name (eg: flatten), by checking the .py file of each of the model residing inside the applications directory of Keras.
1
"python_installation_directory" -> "Lib" -> "site-packages" -> "keras_applications"
As we are using FLOWERS17 dataset from the University of Oxford, I have specified the num_classes as 17. We will have a test_size of 0.10, which means we use 90% of data for training and 10% for testing.
2. Feature Extraction using ConvNets
1
2
3
4
5
6
7
8
9
10
11
12
13
14
15
16
17
18
19
20
21
22
23
24
25
26
27
28
29
30
31
32
33
34
35
36
37
38
39
40
41
42
43
44
45
46
47
48
49
50
51
52
53
54
55
56
57
58
59
60
61
62
63
64
65
66
67
68
69
70
71
72
73
74
75
76
77
78
79
80
81
82
83
84
85
86
87
88
89
90
91
92
93
94
95
96
97
98
99
100
101
102
103
104
105
106
107
108
109
110
111
112
113
114
115
116
117
118
119
120
121
122
123
124
125
126
127
128
129
130
131
132
133
134
135
136
137
138
139
140
141
142
143
144
145
# filter warnings
import warnings
warnings.simplefilter(action="ignore", category=FutureWarning)

# keras imports
from keras.applications.vgg16 import VGG16, preprocess_input
from keras.applications.vgg19 import VGG19, preprocess_input
from keras.applications.xception import Xception, preprocess_input
from keras.applications.resnet50 import ResNet50, preprocess_input
from keras.applications.inception_resnet_v2 import InceptionResNetV2, preprocess_input
from keras.applications.mobilenet import MobileNet, preprocess_input
from keras.applications.inception_v3 import InceptionV3, preprocess_input
from keras.preprocessing import image
from keras.models import Model
from keras.models import model_from_json
from keras.layers import Input

# other imports
from sklearn.preprocessing import LabelEncoder
import numpy as np
import glob
import cv2
import h5py
import os
import json
import datetime
import time

# load the user configs
with open('conf/conf.json') as f:
  config = json.load(f)

# config variables
model_name    = config["model"]
weights     = config["weights"]
include_top   = config["include_top"]
train_path    = config["train_path"]
features_path   = config["features_path"]
labels_path   = config["labels_path"]
test_size     = config["test_size"]
results     = config["results"]
model_path    = config["model_path"]

# start time
print("[STATUS] start time - {}".format(datetime.datetime.now().strftime("%Y-%m-%d %H:%M")))
start = time.time()

# create the pretrained models
# check for pretrained weight usage or not
# check for top layers to be included or not
if model_name == "vgg16":
  base_model = VGG16(weights=weights)
  model = Model(input=base_model.input, output=base_model.get_layer('fc1').output)
  image_size = (224, 224)
elif model_name == "vgg19":
  base_model = VGG19(weights=weights)
  model = Model(input=base_model.input, output=base_model.get_layer('fc1').output)
  image_size = (224, 224)
elif model_name == "resnet50":
  base_model = ResNet50(weights=weights)
  model = Model(input=base_model.input, output=base_model.get_layer('flatten').output)
  image_size = (224, 224)
elif model_name == "inceptionv3":
  base_model = InceptionV3(include_top=include_top, weights=weights, input_tensor=Input(shape=(299,299,3)))
  model = Model(input=base_model.input, output=base_model.get_layer('custom').output)
  image_size = (299, 299)
elif model_name == "inceptionresnetv2":
  base_model = InceptionResNetV2(include_top=include_top, weights=weights, input_tensor=Input(shape=(299,299,3)))
  model = Model(input=base_model.input, output=base_model.get_layer('custom').output)
  image_size = (299, 299)
elif model_name == "mobilenet":
  base_model = MobileNet(include_top=include_top, weights=weights, input_tensor=Input(shape=(224,224,3)), input_shape=(224,224,3))
  model = Model(input=base_model.input, output=base_model.get_layer('custom').output)
  image_size = (224, 224)
elif model_name == "xception":
  base_model = Xception(weights=weights)
  model = Model(input=base_model.input, output=base_model.get_layer('avg_pool').output)
  image_size = (299, 299)
else:
  base_model = None

print("[INFO] successfully loaded base model and model...")

# path to training dataset
train_labels = os.listdir(train_path)

# encode the labels
print("[INFO] encoding labels...")
le = LabelEncoder()
le.fit([tl for tl in train_labels])

# variables to hold features and labels
features = []
labels   = []

# loop over all the labels in the folder
count = 1
for i, label in enumerate(train_labels):
  cur_path = train_path + "/" + label
  count = 1
  for image_path in glob.glob(cur_path + "/*.jpg"):
    img = image.load_img(image_path, target_size=image_size)
    x = image.img_to_array(img)
    x = np.expand_dims(x, axis=0)
    x = preprocess_input(x)
    feature = model.predict(x)
    flat = feature.flatten()
    features.append(flat)
    labels.append(label)
    print("[INFO] processed - " + str(count))
    count += 1
  print("[INFO] completed label - " + label)

# encode the labels using LabelEncoder
le = LabelEncoder()
le_labels = le.fit_transform(labels)

# get the shape of training labels
print("[STATUS] training labels: {}".format(le_labels))
print("[STATUS] training labels shape: {}".format(le_labels.shape))

# save features and labels
h5f_data = h5py.File(features_path, 'w')
h5f_data.create_dataset('dataset_1', data=np.array(features))

h5f_label = h5py.File(labels_path, 'w')
h5f_label.create_dataset('dataset_1', data=np.array(le_labels))

h5f_data.close()
h5f_label.close()

# save model and weights
model_json = model.to_json()
with open(model_path + str(test_size) + ".json", "w") as json_file:
  json_file.write(model_json)

# save weights
model.save_weights(model_path + str(test_size) + ".h5")
print("[STATUS] saved model and weights to disk..")

print("[STATUS] features and labels saved..")

# end time
end = time.time()
print("[STATUS] end time - {}".format(datetime.datetime.now().strftime("%Y-%m-%d %H:%M")))
-
How to run this script?
Open up a command prompt and go into the folder where you saved this file. Type python extract_features.py. It will extract all the features from the images in your dataset and store it in HDF5 format locally. -
What this script does?
The pre-trained models are loaded from the application module of Keras library and the model is constructed based on the user specified configurations in the conf.json file. After that, features are extracted from the user-specified layer in the model pre-trained with ImageNet dataset. These features along with its labels are stored locally using HDF5 file format. Also, the model and the weights are saved just to show that these could also be done in Keras.
The below table shows the feature vector size for each image for a particular deep neural net model that I used.
| Model | Feature vector size |
|---|---|
| VGG16 | (1, 4096) |
| VGG19 | (1, 4096) |
| InceptionV3 | (1, 131072) |
| ResNet50 | (1, 2048) |
| InceptionResNetV2 | (1, 98304) |
| Xception | (1, 2048) |
| MobileNet | (1, 50176) |
3. Training a machine learning model
1
2
3
4
5
6
7
8
9
10
11
12
13
14
15
16
17
18
19
20
21
22
23
24
25
26
27
28
29
30
31
32
33
34
35
36
37
38
39
40
41
42
43
44
45
46
47
48
49
50
51
52
53
54
55
56
57
58
59
60
61
62
63
64
65
66
67
68
69
70
71
72
73
74
75
76
77
78
79
80
81
82
83
84
85
86
87
88
89
90
91
92
93
94
95
96
97
98
99
100
101
102
103
104
105
106
107
108
109
110
111
112
113
114
115
116
117
# organize imports
from __future__ import print_function

from sklearn.metrics import classification_report
from sklearn.model_selection import train_test_split
from sklearn.linear_model import LogisticRegression
from sklearn.metrics import confusion_matrix
import numpy as np
import h5py
import os
import json
import pickle
import seaborn as sns
import matplotlib.pyplot as plt

# load the user configs
with open('conf/conf.json') as f:
  config = json.load(f)

# config variables
test_size     = config["test_size"]
seed      = config["seed"]
features_path   = config["features_path"]
labels_path   = config["labels_path"]
results     = config["results"]
classifier_path = config["classifier_path"]
train_path    = config["train_path"]
num_classes   = config["num_classes"]
classifier_path = config["classifier_path"]

# import features and labels
h5f_data  = h5py.File(features_path, 'r')
h5f_label = h5py.File(labels_path, 'r')

features_string = h5f_data['dataset_1']
labels_string   = h5f_label['dataset_1']

features = np.array(features_string)
labels   = np.array(labels_string)

h5f_data.close()
h5f_label.close()

# verify the shape of features and labels
print("[INFO] features shape: {}".format(features.shape))
print("[INFO] labels shape: {}".format(labels.shape))

print("[INFO] training started...")
# split the training and testing data
(trainData, testData, trainLabels, testLabels) = train_test_split(np.array(features),
                                                                  np.array(labels),
                                                                  test_size=test_size,
                                                                  random_state=seed)

print("[INFO] splitted train and test data...")
print("[INFO] train data  : {}".format(trainData.shape))
print("[INFO] test data   : {}".format(testData.shape))
print("[INFO] train labels: {}".format(trainLabels.shape))
print("[INFO] test labels : {}".format(testLabels.shape))

# use logistic regression as the model
print("[INFO] creating model...")
model = LogisticRegression(random_state=seed)
model.fit(trainData, trainLabels)

# use rank-1 and rank-5 predictions
print("[INFO] evaluating model...")
f = open(results, "w")
rank_1 = 0
rank_5 = 0

# loop over test data
for (label, features) in zip(testLabels, testData):
  # predict the probability of each class label and
  # take the top-5 class labels
  predictions = model.predict_proba(np.atleast_2d(features))[0]
  predictions = np.argsort(predictions)[::-1][:5]

  # rank-1 prediction increment
  if label == predictions[0]:
    rank_1 += 1

  # rank-5 prediction increment
  if label in predictions:
    rank_5 += 1

# convert accuracies to percentages
rank_1 = (rank_1 / float(len(testLabels))) * 100
rank_5 = (rank_5 / float(len(testLabels))) * 100

# write the accuracies to file
f.write("Rank-1: {:.2f}%\n".format(rank_1))
f.write("Rank-5: {:.2f}%\n\n".format(rank_5))

# evaluate the model of test data
preds = model.predict(testData)

# write the classification report to file
f.write("{}\n".format(classification_report(testLabels, preds)))
f.close()

# dump classifier to file
print("[INFO] saving model...")
pickle.dump(model, open(classifier_path, 'wb'))

# display the confusion matrix
print("[INFO] confusion matrix")

# get the list of training lables
labels = sorted(list(os.listdir(train_path)))

# plot the confusion matrix
cm = confusion_matrix(testLabels, preds)
sns.heatmap(cm,
            annot=True,
            cmap="Set2")
plt.show()
-
How to run this script?
Open up a command prompt and go to the folder where you saved this file. Type python train.py. It will train the Logistic Regression classifier with the features and labels extracted and stored locally. Finally, it prints the RANK-1 and RANK-5 accuracies of the model on unseen test data. -
What this script does?
The features and labels extracted from your dataset are loaded. Logistic Regression model is created to train these features and labels. The trained model could then be used to predict the label of unseen images. I have added some code to visualize the confusion matrix of the trained model on unseen test data splitted using scikit-learn and seaborn.
Show me the numbers
The below tables shows the accuracies obtained for each pretrained model used to extract features from FLOWERS17 dataset using different configuration settings.
Result-1
- test_size : 0.10
- classifier : Logistic Regression
| Model | Rank-1 accuracy | Rank-5 accuracy |
|---|---|---|
| Xception | 97.06% | 99.26% |
| InceptionV3 | 96.32% | 99.26% |
| VGG16 | 85.29% | 98.53% |
| VGG19 | 88.24% | 99.26% |
| ResNet50 | 56.62% | 90.44% |
| MobileNet | 98.53% | 100.00% |
| Inception ResNetV2 |
91.91% | 98.53% |
Result-2
- test_size : 0.30
- classifier : Logistic Regression
| Model | Rank-1 accuracy | Rank-5 accuracy |
|---|---|---|
| Xception | 93.38% | 99.75% |
| InceptionV3 | 96.81% | 99.51% |
| VGG16 | 88.24% | 99.02% |
| VGG19 | 88.73% | 98.77% |
| ResNet50 | 59.80% | 86.52% |
| MobileNet | 96.32% | 99.75% |
| Inception ResNetV2 |
88.48% | 99.51% |
Notice how InceptionV3 outperforms the other Deep Neural Net architectures. This could mainly be due to the presence of 9 network-in-a-network modules codenamed as Inception modules which applies different convolutional filter sizes parallely to an input volume and concatenates the result at output. More details about this can be found in this astounding paper by C. Szegedy et al. - Going Deeper with Convolutions.
Thus, we have built our own Flower Species Recognition System using Deep Neural Nets and Keras. Our system is able to obtain much higher accuracies than state-of-the-art accuracies (which mostly used hand-crafted features for shape, color and texture representations) in this FLOWERS17 dataset. Using this procedure, you could use these pretrained models for your own image dataset and reduce the time consumed to construct a deep neural net from scratch.
Testing on new images
To test on new flower images, we need to have some test images in dataset/test folder. Please use this script to make predictions on unseen test images.
Issues and Workarounds
(Updated on 10/06/2018)
-
Intel MKL FATAL ERROR: Cannot load mkl_intel_thread.dll
When I installed Anaconda with Python 3.6 to enable TensorFlow on Windows 10, I got this error. Tried googling the error and this link gave me a working solution. -
no such layer: flatten or custom
This error is the common one found when trying to add Flatten() in any of the model’s .py file. Please update Keras to the latest version. Completely uninstall Keras and reinstall it using pip. Now, get into the similar directory shown below where you have installed Anaconda.
1
C:\deeplearning\anaconda2\Lib\site-packages\keras\applications\
Inside this directory, you can see all the pre-trained models .py file. If you use InceptionV3 as the model, then open inception_v3.py.
Don’t forget to add the below code on top where imports are written.
1
from ..layers import Flatten
Next, go to the place where you can find the final Dense() layer. Normally, we need to perform Flatten() before the last fully connected layer. This is because the final Dense() layer has the number of classes in ImageNet challenge which is typically 1000. We could take these 1000 activations as (1, 1000) feature vector for a single image. But taking features from intermediate layers makes our classifier learn better.
This is how I inserted Flatten() layer to get features from InceptionV3 model. Notice that I have set include_top as False. This gave me a feature vector of size (1, 131072).
1
2
3
4
5
6
7
8
9
10
11
12
13
14
...
...
if include_top:
        # Classification block
        x = GlobalAveragePooling2D(name='avg_pool')(x)
        x = Dense(classes, activation='softmax', name='predictions')(x)
    else:
        if pooling == 'avg':
            x = GlobalAveragePooling2D()(x)
        elif pooling == 'max':
            x = GlobalMaxPooling2D()(x)
        x = Flatten(name='custom')(x)
...
...
- couldn’t see Dense() layer in “model_name”.py applications folder
This issue is seen in Keras 2.2.0 version update. Keras has externalized the applications module to “keras_applications” from where all the pre-trained models are getting imported. To make changes to the pre-trained_model.py file, simply go to the below directory where you will find all the pre-trained models “.py” files.
1
"python_installation_directory" -> "Lib" -> "site-packages" -> "keras_applications"
In case if you want to keep the previous Keras version, simply do the following two commands.
1
2
pip uninstall keras
pip install keras==2.1.2
References
- Keras - Official Documentation
- Building powerful image classification models using very little data
- A Comprehensive guide to Fine-tuning Deep Learning Models in Keras (Part I)
- A Comprehensive guide to Fine-tuning Deep Learning Models in Keras (Part II)
- 17 Category Flower Dataset
- 102 Category Flower Dataset
In case if you found something useful to add to this article or you found a bug in the code or would like to improve some points mentioned, feel free to write it down in the comments. Hope you found something useful here.